Presentation on the topic "general rules for the design of a presentation." Tips for creating the right presentations Sequence of slides in a presentation
Microsoft PowerPoint is a powerful set of presentation tools. When you first explore the program, it may seem that creating a demo here is really easy. Maybe so, but most likely a rather primitive version will come out, which is suitable for the most minor shows. But to create something more complex, you need to delve into the functionality.
First of all, you need to create a presentation file. There are two options here.


Now that PowerPoint is working, we need to create the slides - the frames of our presentation. The button is used for this. "Create Slide" tab "Home", or a combination of hot keys "Ctrl" + "M".

Initially, a title slide is created, which will show the title of the presentation topic.

All further frames will be standard by default and have two areas - for the title and content.

A start. Now all you need to do is fill your presentation with data, change the design, and so on. The order of execution does not really matter, so the next steps do not have to be done sequentially.
Appearance customization
As a rule, even before the start of filling the presentation with data, the design is configured. For the most part, they do this because after adjusting the appearance, existing site elements may not look very good, and you have to seriously rework the finished document. Because most often they do it right away. To do this, use the tab of the same name in the header of the program, it is the fourth from the left.
To configure, go to the tab "Design".

There are three main areas here.

It is worth talking about the last option in a little more detail.
Button "Background Format" opens an additional side menu on the right. Here, in the case of installing any design, there are three tabs.


These tools are quite enough to make the presentation design not only colorful, but also completely unique. If the presentation does not have the specified standard style selected by this time, then in the menu "Background Format" will only "Pouring".
Slide layout customization
As a rule, before filling the presentation with information, the format is also configured. There is a wide range of templates for this. Most often, no additional layout settings are required, since the developers provide a good and functional assortment.


If, nevertheless, there is a need to create a slide in a layout that is not provided for by standard templates, then you can make your own blank.


At the end of all work, press the button "Close sample mode". After that, the system will return to working with the presentation again, and the template can be applied to the slide in the manner described above.

Filling with data
Whatever was described above, the main thing in the presentation is filling it with information. Anything can be inserted into the show, as long as it harmoniously combines with each other.
By default, each slide has its own title and a separate area is allocated for this. Here you should enter the name of the slide, the topic, what is said in this case, etc. If a series of slides speaks about the same thing, then you can either delete the title, or simply do not write anything there - the empty area is not displayed when the presentation is shown. In the first case, you need to click on the border of the frame and click the button Del. In both cases the slide will not have a title and the system will label it as "nameless".

Most slide layouts use "Content area". This section can be used both for entering text and for inserting other files. In principle, any content added to the site automatically tries to occupy this particular slot, adjusting to the size on its own.

If we talk about the text, then it is easily formatted with standard Microsoft tools Office, which are also present in other products of this suite. That is, the user can freely change the font, color, size, special effects and other aspects.

As for adding files, the list is wide. It can be:
- Images;
- Mathematical, physical and chemical formulas;
- SmartArt schemes, etc.
To add all this, a variety of methods are used. In most cases, this is done through the tab "Insert".

Also, the content area itself contains 6 icons for quickly adding tables, charts, SmartArt objects, pictures from a computer, images from the Internet, and video files. To insert, you need to click on the corresponding icon, after which the toolkit or browser will open to select the desired object.
Inserted elements can be freely moved around the slide with the mouse, manually selecting the desired layout. Also, no one forbids changing sizes, position priority, and so on.
Additional functions
There are also a wide range of different features that enhance the presentation, but are not required to be used.
Transition setup
This item is half related to design and appearance presentations. It does not have such paramount importance as setting up the external one, so it is not necessary to do it at all. This toolkit is located in the tab "Transitions".

In the region of "Go to this slide" presents a wide selection of different animation compositions that will be used for transitions from one slide to another. You can choose the presentation you like the most or suit the mood of the presentation, as well as use the customization function. The button is used for this. "Effect Options", each animation has its own set of settings.
Region "Slide Show Time" no longer has to do with visual style. Here you can set the duration of viewing one slide, provided that they will change without the author's command. But it is also worth noting here the important button for the last paragraph - "Apply to all" allows you not to apply the transition effect between slides on each frame manually.

Animation settings
You can add a special effect to each element, whether it is text, a media file or anything else. It's called "Animation". The settings for this aspect are located in the corresponding tab in the program header. You can add, for example, the animation of the appearance of an object, as well as the subsequent disappearance. detailed instructions for creating and configuring animation is in a separate article.
Hyperlinks and control system
In many serious presentations, control systems are also set up - control keys, slide menus, and so on. For all this, the hyperlink setting is used. Not in all cases, there should be such components, but in many cases this improves perception and systematizes the presentation well, practically turning it into a separate manual or program with an interface.
Outcome
Based on the foregoing, we can come to the following most optimal algorithm creating a presentation, consisting of 7 steps:
- Create as many slides as you need
It is far from always possible for the user to say in advance how long the presentation will be, but it is best to have an idea. This will help in the future to harmoniously distribute the entire amount of information, set up various menus, and so on.
- Customize visual design
- Distribute slide layout options
To do this, either existing templates are selected, or new ones are created, and then distributed to each slide individually, based on its purpose. In some cases, this step may even precede the setting of the visual style, so that the author can adjust the design parameters just for the chosen arrangement of elements.
- Enter all data
The user brings all the necessary text, media or other types of data into the presentation, distributing it over the slides in the desired logical sequence. All information is edited and formatted here.
- Create and configure additional elements
At this stage, the author creates control buttons, various content menus, and so on. It is also not uncommon for individual moments (for example, creating slide control buttons) to be created during the framing stage so that you do not have to manually add buttons each time.
- Add secondary components and effects
Setting up animations, transitions, musical accompaniment etc. Usually done already at the last stage, when everything else is ready. These aspects have little effect on the finished document and can always be abandoned, which is why they are dealt with last.
- Check and fix bugs
It remains only to double-check everything by running the preview, and make the necessary adjustments.

Additionally
In the end, I would like to make a couple of important points.
- Like any other document, a presentation has its own weight. And it is the larger, the more objects are inserted inside. This is especially true for music and video files in high quality. So you should once again take care to add optimized media files, since a multi-gigabyte presentation not only presents difficulties with transportation and transfer to other devices, but in general can work extremely slowly.
- There are various requirements for the design and content of the presentation. Before starting work, it is best to find out the regulations from the management, so as not to make a mistake and not come to the need to completely redo the finished work.
- By standards professional presentations, it is recommended not to make large piles of text for those cases when the work is intended to accompany a speech. No one will read all this, all the basic information should be delivered by the announcer. If the presentation is intended for individual study by the recipient (for example, an instruction), then this rule does not apply.
As you can understand, the procedure for creating a presentation includes many more options and steps than it might seem from the very beginning. No tutorial will teach you how to create demos better than just experience. So you need to practice, try different elements, actions, look for new solutions.
MS PowerPoint: “Presentation. Presentation rules. Animation".
What is a presentation and what are presentations
In the general case, a presentation is a set of slides containing information on a specific topic and accompanied by the necessary comments in oral or printed form.
Modern means of multimedia technologies give the teacher the richest opportunities for the implementation of their professional tasks or plans. Presentations can include high-quality graphics and video images, animation, sound, and all these objects can be linked with animation effects.
All presentations are divided into two groups: for individual and classroom use. This is a very conditional division, because in each of the groups several subgroups can still be distinguished. But these two groups have much in common, but naturally, there are many significant differences that must be taken into account when creating them.
Presentations can be linear (linear navigation), i.e. the presentation of information occurs from one slide to another. Linear Presentations are widespread, quickly created and play a significant role in the educational process.
Next group of presentations - interactive presentations(branched navigation), in which the plot is possible, i.e. the transition from one topic to another is possible, and the transitions are controlled by the presenter.
Basic rules for creating a presentation
Before you start creating a presentation, you should clearly understand what needs to be conveyed to the audience, what needs to be told. You need to know who will be the listeners.
There should be nothing superfluous in the presentation. Each slide should be a logical link to the topic of the story and work towards the overall idea of the presentation.
Slides should not be overloaded with unnecessary details, and animation should be used only to draw students' attention to the main, key points of the slide. Sound and visual effects should not come to the fore and distract students from the main information.
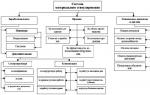
Stages of creating a presentation:
Stage number 1. Getting Started: Select a theme. When choosing a topic, you must also immediately decide whether the presentation will cover several aspects within the same topic, or whether it will be a presentation for one aspect.
Stage number 2. Determining the content and design of the presentation:
1. It is necessary to plan a future presentation. It is desirable that the plan be detailed. You need to draw on paper the structure of your presentation, a schematic image of the slides and figure out what text, pictures, photographs or other materials will be included in one or another slide. Make a list of drawings, photos, sound files, videos (if necessary) that will be placed in the presentation. Define and compose the text part of the presentation
2. Determine whether your presentation will be accompanied by your comments or if you plan it for students to view on their own. The amount of textual information placed on the slides and, as we said above, the font size and type of navigation will depend on this.
4. Decide on a rough design for your slides. It is necessary to think over the color scheme of the backgrounds of the slides, the format of the headings (it is desirable that the same format be maintained in all slides).
Stage number 3. How to create a presentation:
1. Entering and editing text. Text slides are created, only text information is entered on each slide. After entering the text, you need to decide on its location on each slide, think about its formatting, that is, determine the size, color of the font, headings and body text. When choosing a text color, remember that the text should be “readable”, i.e. the background of the slides should not “mute” the text. Do not "take" rare types of fonts, they may not be on other computers, with the help of which the presentation will be shown in other audiences. To determine if the slides are overloaded with text, you may have to leave part of the text for an oral presentation, and if the presentation is shown without the accompaniment of a speaker, then it is necessary to think over the content of the text so that it does not lose its meaning and is understandable. And do not forget about spelling, nothing spoils the idea of you and your work like spelling errors in the text of the presentation.
2. Graphs, charts, tables. If you plan to place graphs and charts in your presentation, then consider their location, determine whether the inscriptions are readable, and do not overload one slide with several graphs or charts, the information will be worse perceived by students. The same applies to tables, the text in the tables should be clearly visible, for clarity in the tables, you can use a weak (in color) cell shading.
3. Images, drawings, background. The background of the slides is very important, it creates a certain mood among the audience and should correspond to the theme of the presentation. Serious presentations should not be colorful, contain bright "poisonous" colors and change colors from slide to slide. If the presentation consists of several large themes, then each theme can have its own color scheme, but not differ much from the overall color scheme of the presentation. Don't make the background too colorful, it will distract the audience and make it difficult to read the text. Now let's talk about illustrations. Graphic objects placed in the presentation should be, first of all, optimized, clear and with good resolution. Graphic objects are not located in the middle of the text, it looks bad.
4. The next step in creating a presentation is to insert an animation. With the help of animation effects, you can significantly improve the perception of the presentation and draw the attention of the audience to the most important points reflected on the slides or in the presentation itself. Before applying animation effects, you need to carefully study the possibilities of intra-slide and inter-slide animation and consider how and where to apply it. The need and type of animation should be logically linked to the structure of the report, the viewer should be ready to see the objects located on the slide in a certain place, and not run around the slide with their eyes. You can use the pointer or mouse pointer to help viewers find what you've already started talking about. Take small pauses between slides so that the audience has time to learn what you told them, do not chatter, but do not mumble. The speech should be energetic, but not deafen the audience, but we are getting ahead of ourselves a little, talking about the art of speaking and oratory, we will talk about this in detail a little later.
5. Soundtrack. If you decide to include audio in your presentation, then be very careful. Music should not drown out the speaker in the first place, irritate the ear, have abrupt transitions, and also lull the listeners to sleep. The soundtrack should organically fit into the theme of your presentation. If you are not sure about the need or choice of the sound accompaniment of the presentation, then it is better not to install the sound accompaniment at all.
6. Fine-tuning the presentation. Fine-tuning the presentation consists in repeatedly viewing your presentation, determining the time intervals necessary for the audience to view each slide and the time for their change. Remember that the slide should be on the screen for so long that the audience can see, remember, and understand its content. Meanwhile, a large interval between slide changes reduces the interest in the presentation. You may need to rearrange some of the slides in order to create a more logical presentation structure or make other adjustments when you finish reviewing your presentation.
Stage number 4. End of the presentation: The presentation should end with a final slide, on which the main conclusions of the report should be placed in concentrated form.
Program launch
On the Windows taskbar, click the Start button.
Move the mouse pointer over the All Programs command. The submenu that appears lists all the programs installed on your computer.
And the proposed list of the program left-click click Microsoft PowerPoint. The program window will open.
Interface and program modes
Tasks area - an area containing frequently used commands specific to a particular task. Its location and small size allow you to use these commands without stopping working on the document.
There are three main views in Microsoft PowerPoint: Normal View, Slide Sorter View, and Slide Show View. Switching between modes is carried out using the buttons in the lower left corner of the program window.
Normal mode is the main editing mode used for recording and designing a presentation.
In the Slide Sorter mode, slides are displayed as thumbnails that can be easily rearranged, thereby changing the order of the slides in the presentation, adding or removing slides. When you finish creating your presentation in Slide Sorter view, you can see big picture presentations.
The Slide Show mode allows you to preview your slides as they will be displayed during the presentation. In this case, the size of the slides corresponds to the size of the screen. When working on a presentation, you can switch to Slide Show at any time and see how the slides will look during the show.
Ways to create a presentation
Starting to create a presentation, you can start from scratch (blank presentation), use standard templates, or modify the finished presentation. The choice of one method or another depends on the specific situation. If you don't have any ideas other than the theme of your presentation, you can use the AutoContent Wizard. K already finished presentation You can apply a slide design template. If you have already decided on the content and design of the presentation, it is better to start with a blank presentation.
1. Launch Microsoft PowerPoint.
2. On the File menu, click New. The Create Presentation task pane opens on the right side of the screen.
The Create Presentation task pane provides options for creating a new presentation.
· New presentation - slides have a minimum of design without the use of a background.
· From design template - A design template is a professionally designed slide that includes a background image, color scheme, and fonts, to which you only need to add text. In addition to the standard program templates, you can use your own.
· From the AutoContent Wizard - Using the AutoContent Wizard, you can quickly create a presentation with standard content and design. The master will guide you through step by step procedure create a presentation by asking for information ranging from the type of presentation to the title of the title slide. After the wizard completes, based on the specified type and style, it will create a complete presentation with standard content that you need to replace with your own.
From an existing presentation - a presentation is created on the basis of an existing presentation with a given design.
Create a new presentation
1. Open Microsoft PowerPoint.
2. In the Create Presentation task pane, click New Presentation.
3. The Slide Layout task pane that appears displays a list of slide layouts.
Slide layout - a layout for placing elements on a slide, such as headings, subheadings, lists, pictures, tables, charts, etc.
The presented layouts are divided into groups:
Text layouts
Content layouts
Layouts of text and content;
other layouts.
When you create a new presentation, the default text layout is Title Slide.
Usage ready-made layouts frees you from some routine operations for the design of the slide, in addition, text frames are included in the layout.
Saving a presentation
If you are saving a presentation for the first time, you must give it a name and specify the folder where it will be stored.
2. In the Folder drop-down list, select the drive and then the folder where the presentation file will be stored.
3. Double-click the name of the selected folder with the left mouse button.
4. In the File Name text box, type Presentation instead of the suggested name.
Note If you later save the file, you do not need to use the Save As command. Simply click the Save button on the Standard toolbar, or select Save from the File menu.
Animation
Animation is the addition of a special video or sound effect to text or an object. For example, you can create text list items that fly to the left of the page one word at a time, or add an applause sound when you open a picture.
Animation of text, graphics, charts, and other objects on slides emphasizes different aspects of the content, controls the flow of material, and makes the presentation more interesting.
To simplify the use of animation, you can use ready-made animation schemes.
Animation scheme - adding ready-made video effects to the text on slides. Each outline typically contains an effect for the title of the slide and an effect for all text or paragraphs of text on the slide.
Animation schemes can be applied both to all slides, only to selected ones, as well as to certain elements located on the slide.
Using the Custom Animation task pane, you can choose where and when an element appears on a slide during a presentation.
For objects located on a slide, it is possible to create four main types of animation effects:
· Entrance. This effect determines how the object appears on the slide. If the effect is not set, then the object appears in the area in which it is located on the slide. If during the slide show you want to enter text or an object accompanied by a certain visual effect, then you must select the Input command in the Animation Setup task pane, and then the desired effect.
· Allocation. An effect that allows you to focus on a specific object already on the slide. In the Animation Settings task pane, you also first need to select the Selection command, and then the desired effect.
· Output. The effect determines how the object will disappear from the slide. For most objects located on the slide, this effect is not needed, but if necessary, you can use one of the 52 animation effects. In the Animation Settings task pane, you must first select the Exit command, then the desired effect.
· Ways of movement. The most interesting type of object animation that allows you to create a path along which the object will follow during animation. If the animation path starts outside the slide and ends on the slide, this effect acts as an entry effect. If the path starts on the slide and ends outside of it, then this effect will be similar to the exit effect. And, finally, if the route starts and ends outside the slide, then the object will appear from behind the slide, "pass" a certain path and disappear outside of it. To create an Object Motion Path, in the Animation Settings task pane, first select the Motion Paths command, and then the desired effect.
You can create multiple animation effects for one object. For example, the entry effect, selection and exit effect. You can also adjust the animation speed for all effects.
Rule 1 Well-organized and logical
The content of the presentation should be clearly structured: harmony and consistency of presentation allow the listener not to get lost in the presentation. This applies both to the oral presentation plan and to visual elements. Each new slide should logically follow from the previous one and at the same time prepare the appearance of the next one. The best way check if the presentation is built correctly - quickly read only the headings. If after that it becomes clear what the presentation is about, then the structure is built correctly.
A person can only remember seven different things at a time, but the presenter of these seven cells can count on a maximum of four.
Rule 2 Brevity - Persuasiveness
Once the content of the presentation is assembled, it should be handled carefully, keeping it as short as possible. Brevity is the sister of not only talent, but also persuasiveness. The optimal size of the presentation is 24 traditional slides, if the presentation fits in 16 slides - even better, but 12 or less slides is something that is rare and memorable.
Rule 3. Death to text! Or 2:1 (2 parts image, 1 part text)
And finally, one more rule, which is all the more important the more often it is neglected. It says: death to the text! Or rather, death to any text, except for the absolutely necessary. There is less sense in it than the vast majority of presenters think, populating slide after slide with lists (marker icons to the left of the beginning of the paragraph). Reading page after page and memorizing the text is not at all easy (let alone reading from the screen is torture), not to mention the fact that naked reading does not convince anyone. In the old days, when presentations were made by professionals, this rule was strictly observed: the amount of text in presentations in the pre-computer era was 35%. Now it reaches 80%. In a word, all unnecessary text should be left either for oral presentation, or replaced with illustrative material: graphs, pictures, etc.
Rule 4: The book is a guide
If suddenly you have forgotten all the rules, remember how the book is framed. Here's a hint for you.
Customizing your presentation with a click makes it easy to show the slides you want right place presentations, provided that another person shows the presentation. Automatic setting The presentation allows the presentation by the presenters themselves, but may cause difficulties in the story (delay or haste in changing slides).
Requirements for the content of a multimedia presentation (for teacher training):
- compliance of the content of the presentation with the goals and objectives;
- compliance with the accepted rules of spelling, punctuation, abbreviations and rules for formatting the text (absence of a dot in headings, etc.), bibliographic description according to standards;
- conciseness with maximum information content of the text;
- the location of information on the slide (preferably a horizontal arrangement of information, from top to bottom along the main diagonal; the most important information should be located in the center of the screen; if there is a picture on the slide, the inscription should be located under it; it is desirable to format the text in width; avoid "torn" edges of the text );
- the presence of no more than one logical stress: redness, brightness, stroke, blinking, movement;
– use only optimized images (for example, reduce using Microsoft Office Picture Manager, compress using the Microsoft Office Image Adjustment Panel);
-correspondence of images to the content;
- image quality (contrast of the image in relation to the background; the absence of "extra" details in the photo or picture, the brightness and contrast of the image, the same file format);
- the quality of the musical series (unobtrusiveness of music, the absence of extraneous noise);
- the validity and rationality of the use of graphic objects.
- the readability of the text on the background of the presentation slide (the text is clearly visible on the background of the slide,
use contrasting colors for background and text);
- use sans-serif fonts (they are easier to read) and no more than 3 font options;
- underlining is used only in hyperlinks.
- the use of a single design style;
– compliance of the presentation design style (graphic, sound, animation) with the content of the presentation;
- use a psychologically comfortable tone for the background of the slide;
- the background should be an element of the background (secondary) plan: highlight, shade, emphasize
the information on the slide, but do not obscure it;
- use no more than three colors on one slide (one for the background, the second for headings, the third for text);
– compliance of the template with the topic being presented (in some cases it may be neutral);
- the expediency of using animation effects.
– operability of navigation elements;
– interface quality;
– expediency and rationality of navigation use.
The presentation should not be boring, monotonous, cumbersome (optimally 10-15 slides).
The title slide contains the author's data (full name and title of the educational institution), the title of the material, the date of development. It is possible to use headers and footers. Other placement of the author's data is acceptable if it interferes with the perception of the material on the title.
The last slide contains a list of sources used, active and accurate links to all graphic objects. On the final slide, you can once again indicate information about the author of the presentation (slide No. 1) with a photo and contact information about the author (mail, phone).
A multimedia presentation with methodological support and attachments must be uploaded as one zipped file.
final call
And I often have to point out to students errors in presentations for term papers and dissertations.
Today I will tell you how to properly design a presentation so that your report makes a good impression on the audience.
It doesn't matter what the purpose of your presentation is, it could be:
- Defense of the abstract, term paper or thesis;
- Report on events or achievements;
- Product overview;
- Advertising company.
For any task, the basic principles correct design presentations are always the same!
So seven simple tips from Sergey Bondarenko and the site.
Think ahead. Don't forget the required sections:
- Title page (first slide);
- Introduction;
- The main part of the presentation (usually contains several subsections);
- Conclusion.
The body of the presentation is the most important.
When creating it, imagine that people who are poorly familiar with the topic of the report will listen to you. They need to understand what your report is about and what your role is in what you are describing.
2. Making a presentation
Style the text and titles of different slides in the same style.
If chosen for headlines blue color and font "Cambria", on all slides the headings should be blue and Cambria. Chosen for body text font"Calibri", you will have to use it on all slides. 
Quotations and notes can be highlighted in a different font and color (but there should not be too many of them).
Don't get carried away with over-excretion fat content, in italics and colored text.
3. Presentation background color
Make sure that the text does not merge with the background, keep in mind that the contrast on the projector will be less than on your monitor.
Best background White(or close to it), and the best text color is the black(or very dark desired shade).
Little test!
Compare these three examples by clicking on the first picture and scrolling with the arrows on your keyboard:


 What color combinations do you like best? Write in the comments!
4. Designing the title (first) slide
From the contents of the first slide it should be clear what it is about, to whom it refers, who is the author. To do this, do not forget to specify:
- Organization (educational institution, enterprise, etc.);
- Topic of the report (title);
- Surname, name and patronymic of the speaker (in full);
- Your manager (if the work is done under someone else's supervision);
- Contact details (e-mail, website address, phone).

An example of a simplified design of the first slide of a presentation
Title slide according to GOST
If you need to get as close as possible to GOST 7.32-2001, then consider the following information from it:
On the title page provide the following information:
— the name of the parent organization;
- the name of the organization-executor of R&D;
— index of the Universal Decimal Classification (UDC);
- codes of the highest classification groups of the All-Russian classifier industrial and agricultural products for research (VKGOKP) prior to putting products into production;
— numbers identifying the report;
— stamps of approval and approval;
- the name of the work;
— name of the report;
- type of report (final, intermediate);
- number (cipher) of the work;
- positions degrees, academic titles, surnames and initials of the heads of the R&D executing organization, R&D leaders;
- place and date of the report.
An example of the title slide of a presentation according to GOST
Here is an example of the design of the title slide of one of my presentations, close to the requirements of GOST:

On the slide you can see:
- Names of parent organization and implementing organization
- Type and name of work
- Position, and full name of the performer
- Artist contact details
- City and year of presentation
Students after the contact details need to add information about the leader(instead of a line about educational institution For example).
note that the design of the first slide is usually different from subsequent ones (general style observed), and the topic of the report is framed in the largest font.
Slide title font size must be at least 24, and preferably from 32 and above.
Always include a slide title (for each slide in your presentation). A distracted listener at any moment should understand what your report is about now!
Font size for body text it is better to choose from 24 to 28 (depending on the selected font type).
Less important material(additions and notes) can be designed in font from 20 to 24. 
Keep in mind that the screen you'll be showing your presentation on will likely be quite far away from the audience. The presentation will look smaller than what is on your screen at the time of creation.
Move 2-3 meters away from the computer screen and try to read the text in the presentation. If the slides are difficult to read, increase the font size. If the text does not fit on one slide, break it into 2, 3 or more slides (the main thing is that the presentation is easy to view).
Try to find suitable images (photos, graphs, diagrams, etc.) 
Remember that the presentation should be visual, and images greatly enhance visibility. Just do not overdo it, images should be replaced by text =)
"Once you have taken the first step, your effectiveness begins to depend on your ability to influence others through the spoken and written word!" (Peter Drucker)
Presentation- this is the most effective method drawing attention target audience, partners, colleagues, and suppliers - to the brand, trademark or company!
With the help of the presentation, you can clearly and comprehensively present all the information about the product, innovations and successes of the company, as well as the prospects for its development, including the opportunity to familiarize partners and investors with the company's business plan.
Visualized information is easier to perceive and remember well!
In order to create an informative and interesting electronic presentation, you need not only special knowledge on software products, in which the presentation is created, but also basic knowledge rules creation effective presentations . And also excellent oratory skills!
Everybody knows Steve Jobs- company founder Apple, entrepreneur, inventor, designer and, among other things, a great speaker! Steve Jobs is an outstanding communicator in the global innovation marketing arena. Jobs' presentations and talks were, and thanks to the surviving video footage, are still enthralling millions of people with their superb delivery of material—simple, accessible, informative, and well-structured—for ease of use! For the sake of such presentations, people traveled thousands of kilometers.
He knew how not only to capture the attention of the audience, but also to keep it throughout the entire speech, he knew how to create passions around the presented product, to amuse the listener, to make him participate in the process, and much more. At the same time, Jobs was self-taught, and he developed for himself certain rules for creating a presentation, which are extremely worth listening to in order to make your presentation successful and effective!
So, the rules for creating a presentation from Steve Jobs!
Act One - Create a Story (Audience Winning Tools)
In order to sell your idea effectively and with positive energy, you need to come up with its story before creating a presentation: main ideas, registration - text, headlines, illustrations, scenario and other components.
1. Scenario. Your presentation and further performance should have its own script, as a kind of "theatrical action", containing an outset, climax, conflict, denouement, villains and heroes, and demonstrations.
Be sure to include in your presentation. demonstration your product! And, if possible, its properties and functions. People always want to see what you're telling them and know what idea you're giving them.
Antagonists and Heroes. Any listener asks questions: Why do I need it? Why do I need this presentation, what is the use of it?". In order to answer this question, you must present the listener with an existing problem, for example, " polluted drinking water- undermines our health!». Problem- this is the antagonist - the enemy with whom you need to fight. Hero it's yours product, for example, unique filters for water purification, which solves the problem contaminated water and eliminates the risk of harm to your health, i.e. defeat the antagonist. By introducing the antagonist and the hero, you give the listener a clear understanding of why he needs it!

2. Text, bullets, headings, props, etc. Texts and bullets (lists) These are the most inefficient ways of presenting information. That's why The text of the presentation should be as short as possible. and highlight only really important textual information. For some reason, bullets or lists are considered a friendly form of presentation of text and are offered in all presentation templates as a basis. But no, bullets are effective only in cases where their number is small - 3-4 pieces. in the list. Otherwise, no one will remember anything that is on the list. Try to focus on the number 3, the human brain is designed in such a way that it focuses attention and easily remembers exactly three positions no matter what. Magic number 3 should flow through your presentation. When you write a presentation script, highlight three ideas that your listeners should take away from the speech - easy to remember and reproducible without written cheat sheets. Use the so-called rule of three" as often as possible!
It is very important to "decorate" your text rhetorical devices - metaphors And analogies. They will make your text attractive, besides, examples and comparisons allow you to remember even complex information! A vivid example of this is the metaphor of Steve Jobs: “ For me, a computer is the equivalent of a bicycle for the brain. ! ". Use "live" epithets in your text - incredible, amazing, luxurious, smart, etc. Words that catch and create a positive effect from your speech. Avoid professional jargon! Use it as rarely as possible, only when necessary and with a mandatory explanation of the meaning.
header should be short, 140 characters or less, no matter how strong the idea is! The most memorable is the following sequence of words in the title: “subject, predicate, object”. For example, when Jobs presented iPhone he exclaimed: Today Apple invented the phone!", or an iPod presentation: " iPod. A thousand songs in your pocket».
Props. The entire audience of listeners can be divided into three types of people: visuals, auditory And kinesthetics. It is necessary to capture the attention of all three types, so the presentation should not consist only of slides and speech text, it is necessary to prepare props - product samples that can be demonstrated to the audience or transferred to the hall.
Act Two - Create an Experience (Secrets of a Fascinating Presentation)
1.Image superiority. As already noted, the text electronic presentation should be as concise as possible, as opposed to requiring the presence of images in the presentation. Photos, illustrations and diagrams present any information much brighter, more accessible and more visual, causing understanding and necessary emotions in the audience.
2.Numbers. If you can’t get away from presenting digital information in your presentation, then make the numbers an advantage and create the desired effect with their help. To do this, you need to give your numbers an attractive look, i.e. give them some interest or significance to the audience. For example: "30 GB of iPod storage is enough to store 7,500 songs, 25,000 photos, or 75 hours of video."

3.Entertainment. Do not forget that the audience needs to be entertained and distracted for a while, for example, play a game with the audience, show some kind of scene or invite a guest.
4. Moment "Wow!". Be sure to prepare a moment that excites your audience. The moment concerning one things or one topic! The moment that the listener would remember first if someone asked him: “ what happened at the presentation?". For example: at the presentation of MacBook Air - the thinnest laptop in the world, Jobs showed the really unique thinness of the laptop by sealing it in a postal envelope!
Act Three - Improve and rehearse (charisma, speech control, naturalness, body language)
- Never read on paper otherwise the audience won't listen to you. You should speak in a relaxed manner so that you get the impression that you are talking to each listener individually.
- Make eye contact with your audience- your eyes should be constantly fixed on the audience, and not on the slides of the presentation.
- open positions- do not cross your arms or legs, do not stand behind the podium, do not turn your back to the audience!
- Gesticulation- use techniques and gestures to create the desired effect of your speech and emphasize the most important points.
- Control your speech volume emphasize important points with loud exclamations and make pauses between separate semantic parts of speech.
- Enjoy from your performance show the audience your passion for the idea or product that you show!
- Change the way you present information every 10 minutes- pictures, video, speech, guest performance, etc., all this should constantly involve the listener in the presentation and, at the same time, give a "breath" to his perception!
Now you know how to make a "live" presentation! Apply these rules and create new successful presentations. And, who knows, perhaps the great communicator - Steve Jobs - will be far behind you in matters of success and brand attractiveness!