Make a birdhouse from a 5 liter bottle. Do-it-yourself birdhouse from a plastic bottle - photo
Winter colds make themselves felt in full. And on another frosty and snowy day, you want to stay at home and just watch your favorite movies, wrapped in a warm blanket, drinking tart aromatic tea with a slice of lemon. But our feathered friends living in the forests are not so sweet. And more and more more birds flock to residential areas and look into the windows, banging their beaks on the glass and asking for bread crumbs or grains. And when spring comes, many birds will return from warm countries, find a mate for themselves and begin to look for a nest suitable for breeding.
It's time to take care of our smaller brothers and make a birdhouse. In order not to bother yourself much with the search for suitable materials, we offer you several options from improvised means. So, for example, you can quickly make some kind of birdhouse from a plastic bottle.
Large plastic house
by the most best material the most common five-liter container from under the water will serve. Due to its large size, such a birdhouse made of a plastic bottle is equally well suited for both small birds and their larger friends.
In the bottle, it is necessary to cut a hole (one or more) of such a diameter that the bird can fit freely there. For the convenience of birds, you can make a perch in the house. To do this, in the bottle, on the side opposite to the hole made, you need to pierce a hole with an awl or scissors. It must be made in such a way that one end of the perch inserted into it goes into the hole through which the birds will crawl into the feeder.
Arrangement of the house
By making such birdhouses from plastic bottles with your children, you will not only instill a love of nature in little pranksters, but also teach them to help others, take care of nature, and just have a great time. The birdhouse can be left transparent, or you can decorate it with ribbons, decorate it with waterproof paints. Sand, cloth, hay or twigs should be placed at the bottom of the bottle - this will make the birdhouse more comfortable and attractive to birds. Some birds bring their own bedding material and make their own nest. The bottle should be hung higher on a thick tree trunk, where no one will disturb the birds.

How to make a birdhouse from a plastic bottle: we select materials
To create this spectacular version of the bird house, you will need the following tools and materials:
Pliers;
Drill and drill bits 1/4 and 1/16;
Actually a plastic bottle with a volume of 2 liters, it is better to peel off the label immediately;
Stationery knife;
Waterproof acrylic paints (light brown, dark brown, black, beige and dark green);
Sponge or brush for applying paint;
Old unwanted CDs; wire;
Scissors;
Glue for plastic things;
Insulating tape or tape.
All materials can be easily obtained at home. When everything you need is found, we move on to the work of the artisans.

Birdhouse for birds - do it yourself, do it yourself
1. We take an ordinary two-liter bottle of mineral water. At a distance of 3 cm from the bottom, we make a round hole with a sharp clerical knife.
2. Just below the hole made, we drill a hole with a drill and insert a long dowel there. This will be the perch for the starling. Just imagine how wonderful it will be to wake up in the morning from the melodious chirping of a starling tree sitting at the entrance to your house.
3. After that, paint the bottle with brown paint in two layers. Birds like their house to be dark and cozy, so a plastic bottle birdhouse should be painted over carefully, without gaps.
4. Now we take a bottle cap and drill two small holes in it, thread a wire into them and carefully twist the ends. You should get a reliable loop for attaching the house to a tree or pole.
The bird house is ready! You can leave it like that, or you can spend a little more time to make it even more beautiful.

Decorate the bird's house
1. We take paper or thin flexible plastic and make a window stencil out of it, the image of which will decorate the birdhouse from a plastic bottle.
2. Next, we will make a beautiful roof. To create shingles, you need to heat the CD a little to make it easier to cut. You need to cut into approximately the same pieces according to the principle of the cake. Each piece must be painted with dark brown paint, or you can make the tiles multi-colored.
3. Now we attach the roof to the house. The first (lowest) layer must be “planted” on the glue and additionally secure each piece with adhesive tape. So birdhouses made of plastic bottles will be more reliable. Each subsequent layer can be fixed only with glue. The house is ready!
Making your home cozy

How to make a birdhouse out of a plastic bottle more comfortable? Starlings are birds that seek out on their own necessary materials for bedding in your nest. But after all, it is absolutely not necessary that these representatives of birds settle in the bird dwelling you made. Therefore, it is better to immediately take care of the comfort of future inhabitants.
At the bottom of the birdhouse, you can lay rags, pieces of cotton wool, twigs, hay, fluff. Birds will appreciate such a gift and will delight you with perky twitter.
Where is the best place to set up a bird house?
Birds like their nest to be as high off the ground as possible. Therefore, first of all, the place must be safe. Therefore, when attaching a birdhouse to a tree, you should choose thick and strong trunks. It is desirable that bird housing is not conspicuous - feathered inhabitants do not need extra attention during the period of incubation of chicks. You can also mount the birdhouse to fairly high metal poles. So there will be confidence that a malicious cat or playful children will not get to the birds' homes and will not harm the inhabitants.
As you can see, making a birdhouse out of a plastic bottle is quite easy and not costly in terms of money and time. Therefore, be sure to try to make such a bird house with your children.
The love of birds or a simple desire to get rid of pests in their area makes many summer residents think about making a birdhouse. Not everyone knows that not only starlings, but also many other birds can live in a birdhouse. For example, small owls can live in a birdhouse that will hunt for small rodents, and if you manage to settle singing birds in your dacha, then you can enjoy their beautiful trills throughout the warm season. In addition to practical and aesthetic benefits, making a birdhouse together with your children will help develop their love for nature and work.
How to make a birdhouse with your own hands, and what types of birdhouses are, you can find out by reading our article.
Materials and tools for manufacturing
Professional ornithologists advise using hardwood boards for the construction of a birdhouse:
- Alders.
- Aspens.
- Birches.
Softwood boards are not recommended as they release resin which can harm birds. You also do not need to make a birdhouse out of plywood, because it has poor thermal insulation properties and the birds will be cold in such a house. In addition, plywood does not transmit sounds well, and this negatively affects the reaction of birds when predators appear. It is strictly not necessary to build a birdhouse from chipboard or fiberboard, first of all, such a birdhouse will fall apart after the first heavy rain, and secondly, chipboards are made using toxic substances that can damage the health of birds.
 Larch boards
 In addition to hardwood planks, you will also need:
- Hand saw or electric jigsaw.
- Hammer.
- Drill.
- Chisel.
- Measuring tape and ruler.
- Pencil.
- Nails.
- Joiner's glue.
- Water-based paint (if you want to paint the birdhouse).
Consider one more important point, no matter how much you want to build the most beautiful birdhouse, in no case do not treat the surface of the boards with a planer! The boards should not be planed, this is necessary for the chicks to be able to climb the walls of the birdhouse.
Making a birdhouse
Referring to the drawing below, proceed as follows:


- Mark up by transferring the dimensions of the parts from the drawing to the boards.
- Using a jigsaw or hacksaw, cut out the details according to the markup.
- Using a drill or chisel, make a hole with a diameter of 40 millimeters in the front wall of the birdhouse.
- Put the side walls in a vertical position and glue the front wall with the made notch to them. It is very important to avoid gaps when gluing.
- After the glue has dried, reinforce the joints of the side and front walls with nails.
- Glue the lower ends of the connected walls with glue and glue the bottom of the birdhouse to them. After the glue dries, also nail the bottom to the walls.
- Attach the back wall in the same way.
- Make the roof of the birdhouse by connecting the retaining spike and the lid.
- Put the roof on the birdhouse. The roof does not need to be nailed or glued, as it must be removable so that the birdhouse can be cleaned.
- Additionally, for the convenience of the birds, you can install a bar or pole in front of the hole.
A simple birdhouse made of boards is ready! It remains to properly hang it on a tree or pole.
 Simple birdhouse
 How to make a simple birdhouse, see also the video:
Birdhouse placement
In order not to harm the trees, you should not nail the birdhouse to the trunk or branch with nails. Many people hang birdhouses on metal wire, but this method also harms trees, because over time the wire damages the bark and the wood begins to rot. It is best to hang the birdhouse on a thick rope made of organic material or on a wooden crossbar sandwiched between branches.
 Ways to install a birdhouse
 When placing a birdhouse, consider the height, if it is hung very low (less than two meters), then wild and domestic predators can easily reach the masonry or chicks.
When hanging a birdhouse, take care of their convenience, give the birdhouse a slightly tilted forward position, this will allow the birds to easily move from the bottom to the entrance.
When choosing a place for a birdhouse, do not place it near thick branches, which in windy weather can damage the structure of the house.
 Set up a birdhouse with a partner
 Since the work on fixing the birdhouse takes place at a fairly high altitude, be sure to work with a partner who will belay and help you on the ground. It is also desirable that you have a mounting belt tied to a tree.
Birdhouses from improvised materials
You can make an original birdhouse not only from wood. There are many items from which wild human imagination can create a bird house, let's look at some of them:
Birdhouse from a plastic bottle
From a plastic bottle, you can make both a large and a small birdhouse, it all depends on the displacement. As a permanent home for birds, a plastic birdhouse will not work, but as a winter feeder it will do. 
To make a birdhouse:
- Take a plastic bottle with a volume of five liters.
- Cut a hole with a diameter of 3-4 centimeters from the bottom of the bottle.
- Tape the edges of the hole with tape or adhesive tape to prevent the birds from getting hurt on sharp edges.
- The fastening of a birdhouse-bottle can be made in the form of a loop sticking out of the neck and clamped with a lid.
- Additionally, you can insulate the birdhouse by wrapping it with felt and tape.
- In conclusion, you can place dry straw on the bottom of the birdhouse or simply pour bird food.
If you are a creative person, you can also paint the bottle or decorate it with decorative elements.

There are many options for feeders and birdhouses from plastic bottles, but the manufacturing principle is the same for everyone, this is cutting out a notch, a fastening device and your imagination for design.
Instructions for making a birdhouse from a plastic bottle are also in the video:
Birdhouse made of cardboard
Despite the absolute non-resistance of cardboard to water, it is quite realistic to make a birdhouse out of it that will last at least a year. Below are a drawing and instructions by which you can make a birdhouse out of cardboard. 
To make a cardboard birdhouse:
- Take a piece of cardboard or take apart one or more cardboard boxes. The denser and thicker the cardboard, the longer the birdhouse will last.
- Draw on the sheet the pattern that you see in the picture.
- Cut out the drawn details.
- Fold the pieces along the fold lines.
- Take a wide adhesive tape and glue it on the inside and outside of the parts. Also, in place of adhesive tape, you can use any waterproof material and glue. On the inside of the front wall, under the hole, stick a piece coarse fabric so that the birds can easily climb from the nest to the notch.
- Glue the bonding points with universal glue.
- Reinforce the glued corners by sticking tape strips on them.
- Cut a hole for the notch with scissors.
- Tape the inside of the notch with tape.
- Make a hole and insert a pole.
- Paint the birdhouse with paints or decorate with decor.
It is worth noting that it is better to glue the roof in such a birdhouse with adhesive tape and, if necessary, clean it, cut the adhesive tape with a knife and remove the roof.
 Birdhouse made of cardboard
 Birdhouse - made of cardboard, it has a very light weight, so if it is poorly fastened, it can be blown away by the wind.
You can also learn how to make a birdhouse out of cardboard from the video:
Shoe box birdhouse
A birdhouse from a shoe box is made according to the same principle as a birdhouse made of cardboard. the main task is to give the details of the birdhouse absolute waterproofness. This can be achieved - either by gluing a waterproof film, or by coating parts with water-repellent paint. 
Thick log birdhouse
This type of birdhouses is closest to natural environment habitats of birds living in hollows of trees. To make it you will need:
- A piece of log with a diameter of 20-3 centimeters and a length of 40-50 centimeters.
- Chainsaw or two-handed saw.
- Powerful drill with a wide drill bit.
- Large wide chisel.
- Hammer.
- Clamps (for clamping a log during sawing and drilling).
- Nails.
 Leave the walls 3-4 centimeters.
 The technology for making a birdhouse from a log is quite laborious, so it is advisable to produce this work with a partner.
- Clamp the log with clamps.
- Saw off two dies at the log, 4-5 centimeters thick, they will serve as the roof and bottom of the birdhouse.
- Take a drill and start drilling the log from the inside. When drilling, leave walls 3-4 centimeters thick along the edges of the log.
- If the length of the drill is not enough for through holes, drill from both sides.
- With the help of a chisel and a hammer, give the inner walls of the birdhouse a final, round shape.
- Drill a hole for the notch and install a pole or bar under it.
- Nail the bottom of the birdhouse.
- The roof of the birdhouse can simply be baited with a few nails so that it can be easily removed if necessary.
 Log birdhouse
 In no case do not make a birdhouse from wet wood, otherwise, after drying, it may crack and fall apart. Also, it is desirable to treat with water-repellent paint - the bottom, roof and parts of the birdhouse that are not protected by bark.
You can see another option for making a birdhouse from a log in the video:
Wine cork birdhouse
The name of the birdhouse is not entirely correct, since wine corks serve only as a decoration. The name would be more correct: a birdhouse decorated with wine corks. In addition to decorative properties, the wine cork has good thermal insulation characteristics, therefore, in a birdhouse decorated in such an unusual way, the birds will be warm.
 Birdhouse decorated with wine corks
 If you decide to ennoble your birdhouse with wine corks, then prepare the following tools and materials:
- Glue.
- Glue gun.
- Lots of wine corks.
There are three ways to decorate with wine corks:
- The first method involves cutting the cork into several round dies. After that, the dies are glued to the roof and walls of the birdhouse.
- The second way is to cut the cork longitudinally into two semicircular parts and then finish the walls of the birdhouse with them.
- The third way - excludes cutting. The cork is glued in its entirety.
 Multi-apartment birdhouse decorated with corks
 It makes no sense to choose any one method for decoration, the birdhouse will look prettier if it is decorated in all three ways. For example: the roof - with dies, the side walls - longitudinally cut, and the front wall - with whole plugs.
Variants, design and decorative elements of birdhouses
There are many options for birdhouses of unusual shape and design, we offer you photos of some of them:

- Birdhouse - "barrel". It is made from half-bent rails and round blanks glued together. Plastic elements imitating a vine and a hemp rope were used as decor. Such a birdhouse is difficult to manufacture and is not recommended for people who do not have experience in carpentry.

- The "three-room" birdhouse is made of three sections of different shapes, interconnected. The peculiarity of the birdhouse is to use the front wall as a removable element, and not the roof as in conventional models.

- Birdhouse - "shoe". A budget option for a birdhouse from an old shoe. Boards and galvanized iron were used as protection against precipitation.
- Birdhouse from the body of an old rotary phone. An environmentally unsafe birdhouse, since substances harmful to birds can be released from the plastic case when heated on a salt lick.

- Birdhouse from an old canister. A good design decision, but the use metal products for nesting birds, it is not recommended by ornithologists, because in summer it is hot in such birdhouses, and in the cold period, birds can freeze.
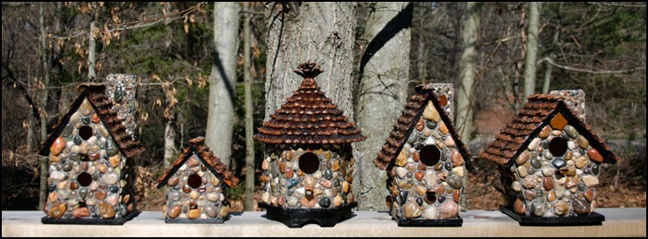
- Birdhouses decorated with stones. A beautiful version of birdhouses, but a significant disadvantage can be the weight of the product, especially when installed at a height.

- Birdhouse - "hut", made of glued beams folded in a rustic frame. Beautiful birdhouse, but very difficult to manufacture.
Thanks to human imagination, bird houses will always be replenished with new options, it may happen that you will become one of the authors of the new birdhouse design!
A good thing is to work and hang a birdhouse. And right. Both for birds and for the man himself.
The tradition of building artificial bird houses is deeply rooted in history.
Birdhouses are needed for birds. Previously, in almost every yard where there are trees, birdhouses hung. This was the tradition. Which, they say, has deep historical roots. It is not known when it all began, but in the images of the early 16th century, you can already see birdhouses. Made of wood and clay.
It was a noble, in fact, and very feasible human help to our smaller brothers, so that there was somewhere to hide from the rain, build a nest and raise chicks. After all, it was man who ousted the birds, for example, from the city. Often, either to the birdhouse itself, or in the immediate vicinity of it, a feeder was arranged, where, with enviable constancy, caring people poured cereals, millet and other treats for birds.
Birdhouses, of course, were inhabited by starlings, tits, sparrows, flycatchers and other bird brethren. Now, besides sparrows and doves, well, perhaps even ravens and swallows, the city dweller does not know any birds. Yes, it happened that even woodpeckers and even squirrels moved into birdhouses.
The process of making a birdhouse from plastic bottles with your own hands is described in detail.
Would need:
- two plastic bottles of 5 liters. for the house, as well as 2l. for cutting "tiles";
- wooden perch;
- scissors;
- marker;
- glue or Double-sided tape;
- brush;
- paints;
- acrylic front lacquer;
- burlap for the interior of the birdhouse;
- various decorating elements (small sticks, flowers, butterflies, bells, ladybugs etc.).
Making a birdhouse begins with cutting out the “tiles” on the roof of the house according to the pattern. A template is applied to the inside of 2l. bottles, the contour of which is transferred with a marker to plastic, and then cut out.


Below the entrance, there should be a perch. It is attached very simply, a mark for the cut is drawn on the bottle with a marker, an incision is made along the lines and a perch is inserted.

Through the notch of the birdhouse, burlap is glued to the inner walls of the house! On the smooth walls of the bottle, the chicks will not be able to get out of the house, so their surface should be rough and textured.
After, with the help of glue or double-sided tape (not essential), the “tile” is laid over the entire area of the roof of the birdhouse.
In the end, this is such a wonderful workpiece!


Then the birdhouse is painted. Birds prefer dark and secluded places, so the house is completely painted over. Can be used acrylic paints or even gouache, because after painting the surface of the birdhouse is varnished!
When painting a bird house, the creativity and boundless imagination shown will make the birdhouse very original.
The main thing is to let each layer of paint dry properly!
Gradually, the workpiece takes on a finished look.

The top of the bottle is painted to look like brickwork. And then, in order to hide the end of the last level of the tile, a rope is wound over it.
The “tiled” roof, with the help of different shades, is given a “live” look.

After painting, you can start decorating the birdhouse, the final stage in creating a birdhouse.
With the help of sticks, a fence is created. The sticks are first glued in a bottle, and then tied with a rope until the glue dries completely.

The resulting fence, if desired, can be painted.
Also, in addition to the fence, the entrance (notch) of the birdhouse is decorated with branches and an edge is created around the house. Decorative ladybugs, evenly distributed throughout the house.

The perch is wrapped with a rope, having previously secured it with double-sided tape or glue. The end of the perch is decorated with a bell.

That's actually all!
A fabulous birdhouse made of plastic bottles is ready!

For each of us, since school years, the arrival of spring has been associated not only with warm sunny days, the first young tender greenery, swelling buds, running streams and birdsong, by March 8, but also with the manufacture of birdhouses for birds.
It only at first glance seems that making a "house" for starlings is not difficult at all and this does not require special skills and knowledge. In fact, it is quite difficult to make a real, practical and convenient birdhouse, even if you have a basic idea of \u200b\u200bcarpentry.

Paying attention to a birdhouse hanging on a tree, pole or somewhere else, few people think about the fact that it is not enough just to make and hang it, it turns out that it still requires annual “maintenance”. Every year at the beginning of spring, the birdhouse should be opened, cleaned and the garbage caused by former guests removed so that the newly arrived birds can safely build a nest in it and have offspring. Therefore, when making a birdhouse, it is very important to make it collapsible or at least with one opening wall.

In our article, we want to bring to your attention three options for making birdhouses, each of which is accompanied by detailed drawings and an intelligible description, thanks to which you can easily, quickly and simply make your own house for songbirds and look forward to their settlement.
1. So, do-it-yourself birdhouse, called "Blue Reel"

The front wall of the birdhouse, measuring 20x170x325 millimeters from coniferous lumber - one piece;
The rear wall of the birdhouse, measuring 20x170x260 millimeters from coniferous lumber - one piece;
The side walls of the birdhouse, measuring 20x175x225 millimeters from coniferous lumber - two pieces;
Decorative birdhouse board, 20x90x240 mm in size, made of coniferous lumber - one piece;
The bottom of the birdhouse, measuring 20x150x90 millimeters from coniferous lumber - one piece;
The roof of a birdhouse, measuring 20x235x190 millimeters from coniferous lumber - two pieces;
A perch for a birdhouse, 8 mm in diameter, 75 mm long, made of beech dowel - one piece.
DIY birdhouse - step by step description work.

Step one. To begin with, using the proposed sketches and the indicated dimensions, it is necessary to make templates for the front wall of the birdhouse and two decorative boards from fiberboard, six millimeters thick, using which you should later transfer, using a simple pencil, the outline of the sketch one to one onto a pine board, twenty millimeters. Next, you should cut out all the drawn details with a jigsaw, and also drill an inlet on the front wall with a diameter of thirty-two millimeters.
Step two. Using the made template of the front wall of the birdhouse, it is necessary to once again transfer the contour of the part to a pine board, twenty millimeters thick and cut out the back part without making an inlet.
Step three. The side walls of the birdhouse must be cut out of a pine board, one hundred and seventy-five millimeters wide. The upper edges of the walls should be beveled at an angle of sixty-seven degrees, and the lower ones at an angle of seventy-eight degrees, after which the length of the side walls, measured from the inside, should be equal to two hundred and twenty-two millimeters
Step four. Then, from a board one hundred and fifty millimeters wide, you need to cut out the bottom of the birdhouse, the right and left edges of which should be beveled at an angle of seventy-eight degrees.
Step six. After that, the finished parts of the side walls must be attached to the front of the birdhouse with screws (32 mm) and waterproof glue, so that the edges of the side walls protrude 6 mm beyond the front wall.
Step seven. Then, using the same screws and waterproof glue, you need to attach the bottom of the birdhouse.
Step eight. After that, you should fix the roof to the side and front walls of the birdhouse, without touching the back wall.
Step nine. Previously made decorative boards must be attached to the birdhouse with finishing nails or waterproof wood glue.
Step ten. Now you need to cut out the board for installing the birdhouse and at a height of ninety-five millimeters from the bottom edge of this board, you need to attach the back wall of the birdhouse.
Step eleven. In front of the birdhouse, departing from the inlet thirty-two millimeters, it is necessary to drill a hole with a diameter of eight millimeters, a depth of twelve millimeters for a perch and glue a dowel made into it, seventy-five millimeters long.
Step twelve. The finished birdhouse on the outer surface should be covered with finishing paint for outdoor use, the inside should be left in its natural form.
2. Simple do-it-yourself birdhouse for small birds.

Necessary materials for the manufacture of a birdhouse:
The front wall of the birdhouse, measuring 20x100x290 millimeters from coniferous lumber - one piece;
The rear wall of the birdhouse, measuring 20x100x245 millimeters from coniferous lumber - one piece;
The side walls of the birdhouse, measuring 20x145x235 millimeters from coniferous lumber - two pieces;
Decorative birdhouse board, 20x50x175 mm in size, made of coniferous lumber - one piece;
The bottom of the birdhouse, measuring 20x100x120 millimeters from coniferous lumber - one piece;
The roof of a birdhouse, measuring 20x150x200 millimeters from coniferous lumber - two pieces;
Birdhouse attachment board, 20x75x450 mm in size, made of coniferous lumber - one piece;
A simple birdhouse with your own hands- step by step description of the work.

Step one. To begin with, from a pine board one hundred millimeters wide, it is necessary to cut out the front and back walls of the birdhouse and saw off their upper ends at an angle of 60 degrees, thereby forming a ridge.
Step two. Further, at a distance of two hundred and fifty millimeters from the top, it is necessary to saw off the horizontal lower edge of the rear wall, and cut out a semicircular lower edge on the front wall and, retreating seventy-five millimeters from the top, drill a hole with a diameter of 032 mm.
Step three. Then you should cut out the side walls, as well as the upper edges, and bevel them at an angle of sixty degrees.
Step four. The manufactured side walls with screws and waterproof wood glue must be attached to the front wall of the birdhouse.
Step six. After that, from a board two hundred millimeters wide, it is necessary to cut out the slopes of the roof of the birdhouse, mow each at an angle of sixty degrees. Additionally, the front edge of the roof slopes can be made shaped.
Step seven. The made roof must be attached to the side and front walls of the birdhouse, without touching the back.
Step eight. Last of all, it is necessary to cut out the birdhouse attachment board measuring 20x75x450 mm, and, together with the back wall, attach it to the birdhouse itself.
Step nine. The finished birdhouse should be coated, on the outside it should be covered with a finishing paint for outdoor use, in no case covering the inside of the birdhouse.
3. Roomy do-it-yourself birdhouse for small birds.

Necessary materials for the manufacture of a birdhouse:
The front wall of the birdhouse, measuring 20x165x300 millimeters from coniferous lumber - one piece;
The rear wall of the birdhouse, measuring 20x115x260 millimeters from coniferous lumber - one piece;
The side walls of the birdhouse, measuring 20x135x245 millimeters from coniferous lumber - two pieces;
Decorative birdhouse board, 20x65x175 mm in size, made of coniferous lumber - one piece;
The bottom of the birdhouse, measuring 20x115x135 millimeters from coniferous lumber - one piece;
The roof of a birdhouse, measuring 20x175x215 millimeters from coniferous lumber - two pieces;
Birdhouse attachment board, 20x75x450 mm in size, made of coniferous lumber - one piece;
Spacious do-it-yourself birdhouse for small birds - a step-by-step description of the work.

Step one. To begin with, from a pine board one hundred and sixty-five millimeters wide, it is necessary to cut out the front wall, the upper end of which should be made triangular, with an angle at the top of one hundred and twenty degrees, and the lower end curly.
Step two. Then, in the front wall of the birdhouse, you need to drill an inlet with a diameter of thirty-seven centimeters.
Step three. After that, in the same form, the back of the birdhouse should be cut out, but with a horizontal lower edge at a distance of two hundred and sixty millimeters from the top of the wall.
Step five. With the help of nails, screws and waterproof wood glue, the front wall of the birdhouse and two side walls are fastened, then the bottom, roof, back wall and birdhouse attachment board are attached.
Step six. If desired, the birdhouse can be decorated with decorative carved elements.
Step seven. The finished birdhouse, only on the outside is covered with a special finishing paint for wood for finishing work.
But it turns out that birdhouses can be made not only of the traditional pattern from wooden boards, easily accessible, waste material- plastic bottles can also become the basis of a birdhouse for songbirds, and it looks no worse than outwardly.
Birdhouse made of plastic bottles with your own hands.

Necessary materials for the manufacture of a birdhouse:
A plastic bottle, with a volume of two to two and a half liters - one piece;
Plastic bottles, with a volume of one and a half liters - three or four pieces;
Album sheet of paper;
Simple pencil;
Glue gun;
Scissors;
Round stick, about three to four millimeters in diameter, seven to eight centimeters long;
Most are made of wood, but modern parents are ready to make it from any material at hand, such as a plastic bottle. The site "ZnayKak.ru" has prepared for you detailed master class about the simplest birdhouse.
You will need the following materials and tools:
- 5 liter plastic bottle - 1 PC.;
- any twine - 1 skein;
- glue gun, scissors;
- Double-sided tape;
- ribbon and buttons for decoration;
- a piece of woolen fabric;
- needle with thread;
- thick cord;
- marker, clerical knife;
- artificial grass branches.
.jpg)
Manufacturing instructions:
Step 1. Cut off a strip of double-sided tape and stick it on the bottle in a vertical position, then peel off the protective film.
.jpg)
Step 2 Attach the end of the twine to the bottom of the bottle. Tape it on.
.jpg)
Wrap the bottle with twine. Try to place each next row tightly to the previous one. This is how you avoid gaps.
.jpg)
In this way, decorate the entire surface of the flat part of the bottle and its bottom. Be sure to secure the end with glue so that it does not come loose over time.
.jpg)
Step 3 Use a marker to draw a rectangle on one side of the bottle.
.jpg)
Cut it out with scissors or a utility knife.
.jpg)
So you get a hole through which the birds can fly in.
.jpg)
Step 4 To insulate the roof, use the sleeve from an old sweater. Cut off the widest part from it and align the edges.
.jpg)
Step 5 Put a woolen cloth on top of the bottle, but only to the level of the twine.
.jpg)
Sew or glue the top.
.jpg)
Step 6 Cut artificial or real greenery to the required length and glue woolen threads on top.
.jpg)
Step 7 Decorate the hole with ribbon and buttons. Glue or sew them on.
.jpg)
Step 8 To hang the birdhouse, tie a thick cord around the lid. At the same time, make a loop. If desired, you can put straw inside the birdhouse to insulate it.
.jpg)
All that remains for you to do is hang the birdhouse on a tree or under the roof. Put some grains inside to attract birds.
.jpg)
Just from a 5 liter plastic bottle and twine, you can make a birdhouse with your children or several at once.