ZyXEL My.Keenetic - Remote control of the router. The Zyxel Nebula Supernova Cloud is a Cost-Effective Path to Security
Yeah, listen to people like this... "Your old Planet won't handle all your phones," they said. "Buy a new router - everything is simple there," they said. Why did I listen to them? No, buying is trifles, and they didn’t buy that. But you need to set it up! It used to be - set up the Internet for yourself and rejoice ... and here are firewalls, and Yandex DNS, and SIP, and many, many more unfamiliar words. Or rather, I heard the words - something similar was discussed during the construction of the Death Star, then I thought that they were just dressing up ...
By the way, if you suddenly thought that I would start talking about setting up a router or some other modem, then you are mistaken - I do not like to read instructions, much less write. In addition, as the classic said: "and experience is the son of mistakes is difficult" ... I want to talk about something else - here we have a modern router that can do a little more, for example, create a guest network in one click, and how to manage it -then? Is it all through the computer? But what about the twenty-first century? Well, so that, without getting up from the table, to allow some guest access to the most precious thing - the Internet ... It turns out that there is. At least for ZyXEL Wi-Fi routers (hereinafter - Zukhel) ... Softinka, with an unassuming name - ZyXEL My.Keenetic.
By installing the application on our phone, we get full access to the device and at any time, being in the same Wi-Fi network, we can fully control all the necessary functions. Look!
Everything is traditional: we start, read the advice of the "Master" and connect to the router. For this, the developers suggest scanning the barcode of the device, which is located at the bottom of it. They would all just something to scan, photograph, with special effects. The scanning process looks especially impressive when the router is nailed somewhere in a protective box on the wall.
The second connection option is not so effective, but, in my opinion, it will be something for life - we only need to select our network and enter a password (in the first case, it would be the same) and that's it!
No material design. Although, judging by the general trend, it should be said - so far no material design.
Six points.
The first is the Internet. The very best... It's good that I already have it set up, but what if not?
And if not, then we would have to adjust ... Choose the type, enter the settings ... Boredom is, boredom. Or nerves and psychos - depending on the result and what is happening in general.
Wi-Fi - I'm already on the second point of the options.
Here's the most important thing - the ability to turn it off - it's like a bough on which you sit with an ax. No matter how you want to chop, but no matter how it’s not worth it. So, turning off Wi-Fi is a radical thing, and, naturally, after that, any possibility of accessing the device, except from our PC, disappears. Therefore, if there is a desire to sharply cut someone off the network, then it is better to come up with some more progressive way, for example, set a password in the same menu.
By the way, one of the very interesting features is the ability to smoothly control the signal strength.
I'm not even afraid to overestimate its value: firstly, you can smoothly adjust the coverage area - only your floor, for example, or to the stall behind the far fence. Secondly, you can calm paranoid aspirations - this is, as it were, perhaps harmful. Well, there, a microwave, a mobile phone, Wi-Fi radiation ... otherwise we will reduce it and everyone is calmer.
What is WMM, I don't know. Wiki could help, but I don't really care what it is, among other things. I turned it on - it didn’t get worse, let it be. The developers, again, tried, did for some reason ...
It would be logical to pay attention to the item on the right - the guest network. So, suppose we suddenly remembered that our home network contains insanely confidential and eerily secret information. Of course, the first thought would be to turn off Wi-Fi, but, as I already wrote, it's better to just set a password. True, the guests will start to get nervous - how can it be without Vkontaktika? This is where we turn on the guest network - the same Internet, but with absolutely no access to home devices.
In the "Connection" item, we see a list of all devices, and if we tap on any, then we will find extended information.
But most importantly, there is a "fixed IP" slider. In a normal situation, our router distributes addresses according to the principle "who got up earlier - that and slippers", so today my Sony ZL can be the first, and tomorrow the third. As a rule, this is absolutely not important! But, for example, if you have shared any resources, or if you have a network media player, then to set hard permanent connections on other devices, it is simply necessary to fix the media server IP address.
And, of course, the device can be renamed ...
The System tab contains information about the system. Well, there, the logs are different, errors, information about the device ... A separate item was made to update the device.
We can upgrade both to the release and to the beta, and in addition to this, select and install a dozen component extensions with incomprehensible names. By the way, there is a duplicate of this item in the main menu.
Have you ever had a situation when you call the provider's support service, and from there, immediately after the offer to check if you plugged the monitor into the outlet, they offer to reboot the router? From this menu, we can now restart the router without getting up ...
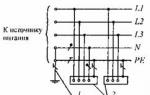
When writing this manual, the Google Chrome browser and the ZyxelKeenetic 4GII internet center were used. It has a wired or wireless (via 3G / 4G modem) Internet access.
The connection diagram looks like this:
The diagram shows the IP addresses of the equipment recommended for initial setup. Later, having mastered the connection method, you can always change them at your discretion.
IMPORTANT: Install the latest Zyxel Keenetic 4G II firmware.
IMPORTANT: This guide does NOT cover WiFi setup and connection.
IMPORTANT: The pictures shown in this manual may differ slightly from the interface. real internet center due to a mismatch of firmware versions.
Setting up the Internet center is carried out in 4 stages.
IMPORTANT: We strongly recommend that during the initial setup of the equipment strictly follow this manual. Specify exactly those addresses and ports that are described in the manual, instead of addresses and ports marked with letters (highlighted in red), substitute your individual parameters!!! This will significantly reduce the time required to set up the equipment.
Stage 1 - preparatory.
At this stage you should:
- unpack the router and connect it to a power source,
- connect the computer to the router to configure it,
IMPORTANT: When you start working with the Zyxel Keenetic 4G II Internet Center, we strongly recommend that you change the default password, because after setting up the Zyxel Keenetic 4G II it will become available over the Internet, which will allow attackers to make unauthorized changes to its operation.
- connect the DVR to the ports on the back of the Internet center, which are yellow.
ADVICE: The kit of the Internet center includes only one cable for connecting peripheral equipment. Since two cables are needed to connect a computer and a DVR, during the initial setup, we recommend connecting the DVR with an existing cable, and connecting the computer via WiFi, the connection parameters are indicated on the label located at the bottom of the Internet center.
- configure the Internet center with the recommended parameters:
1. Assign a home network as shown in the figure, click "Apply"

2. Enter the starting address of the DHCP server pool and the desired size of the address pool, as well as the values of external DNS servers, click "Apply"

IMPORTANT: The picture shows the DNS addresses of PJSC Rostelecom, which operate throughout the Russian Federation. During operation, you can replace them with DNS addresses provided to you by your provider.
IMPORTANT: Later, if you need to change the addresses and size of the built-in DHCP server pool, remember that the static addresses assigned to the equipment (DVR) should not overlap with the range of addresses that are issued from the built-in DHCP server pool.
3. Configure the DVR settings:
- Enter the menu and set the option "Static IP address" in the network parameters
- Enter the network settings as shown below:

IMPORTANT: Be sure to change the default control port value to the ddd value specified in individual parameters. If your DVR has more than one control port, for example, there is a mobile application, media port etc. contact the service technical support.
This completes the first stage. In order to check whether you have done everything correctly, connect to your DVR from your computer connected directly to the router from a browser at 192.168.1.100
If the connection was successful - congratulations, you did everything right, you can proceed to the second stage of the connection.
Stage 2 - Connecting to the Internet.
This is the easiest and most difficult step at the same time. If you are connecting using wired internet, if you have any difficulties, you should be guided by the manufacturer's instructions at the link http://zyxel.ru/kb/2332 and the recommendations of your telecom operator.
When setting mobile connection(using a modem) there are various options related to the features of the firmware of the modems, in the general case, the connection looks like this:
Select the item 3G / 4G modem,

And click "Apply"
As a result, we should get access to the Internet, if it is not, then we advise you to follow the following links: http://zyxel.ru/kb/2343 , http://zyxel.ru/kb/2222 , http://zyxel .ru/kb/3036 , http://zyxel.ru/kb/2360 , http://zyxel.ru/kb/2359 , http://zyxel.ru/kb/4573 it is possible to contact the Internet center manufacturer by phone 8-495-587-8987 (from 9:00 to 18:00 Moscow time), or through the technical support website https://zyxel.ru/user/register.
If you have connected to the Internet correctly, then you should get full access to the Internet from a computer connected to the Internet center. If access is obtained, test the connection from the Internet center to the cloud server. To do this, on the computer, go to:
Start - Run, in the form enter cmd

Click OK, a black window will open, with an input prompt, enter: ping spb.site and press Enter

If you see the Answer ... .., then you have configured everything correctly, you can proceed to the 3rd stage of configuration.
Stage 3 - Creating a tunnel.
To create a tunnel, go to the tab

Click add connection. On the screen, you will see a form that you need to fill out according to your individual connection parameters.

IMPORTANT: In the Type (protocol) item, you can select the PPTP or L2TP tunnel type, however, based on experience, we recommend setting the PPTP tunnel type for wired networks, and the L2TP tunnel type for wireless networks. In the Description item, you can specify an arbitrary name for the tunnel, however, for a better understanding of the connection process, we advise you not to change it.
IMPORTANT: In the "Connect via" item, specify the name of the interface that has access to the Internet. In the description of this interface, you checked the “Use to access the Internet” checkbox, usually it is a wired access or mobile device interface (for example, UsbModem0, etc.) In the Username and password items, enter your individual parameters aaa And bbb respectively.
IMPORTANT: The rest of the parameters, including the checkboxes, must match the parameters shown in the figure.
Click "Apply", and if everything is configured correctly, we will get the following screen:

As a result of the actions performed, the Internet center should connect to the cloud server, as evidenced by a white checkmark in the circle next to the name of the connection.

FOR REFERENCE: It should be noted that the indication in the circle next to the connection, in addition to the checkmark indicating the connection to the cloud server, can take the form of a clock - which indicates the progress of the connection process or a cross, which indicates an unsuccessful connection.
If the connection fails, check if your settings match the settings shown in the figure. Special attention pay attention to the correctness of the name and password, interface and server address. If this does not help, please contact us. If the connection is successful, in the IP address line opposite the connection, you will see the IP address for broadcasting X.X.X.X specified in your individual settings (for some router firmware versions). If the addresses match, you did everything right!!!
Stage 4 - Creating broadcasts.
After you have connected the router to the Internet and created a tunnel to the cloud server, you need to write down the rules for which requests to send where, since, by default, the router sends all requests to world wide web, but we need to write rules that would indicate that requests regarding video surveillance should be sent to the created tunnel. We call these rules translations.
To access video surveillance, we need to create only two translations (for the http port and the control port, since only two ports are needed to access most DVRs). If you have more ports, add them in the same way. In addition to the mandatory ones, we recommend creating two more additional broadcasts for remote access to the Keenetic and checking the availability of the Keenetic over the network.
The interface with configured rules looks like this:

To add a new rule, click the "Add Rules" button and configure the rules we need. First, let's set up the basic rules for the two required ports. sss And ddd. The rules are configured in turn, first for one port, then for another.
The example shows how to set up a rule for a port sss.

For additional ports (the control port and the port for checking the availability of the Internet center equipment), the rules are configured a little differently.
To manage the Internet center, you need to write a rule:

To check the availability of the equipment of the Internet center, you need to register the rule:

Now that packets are allowed to pass through the router, we need to send packets to the DVR, for this we need to create broadcasts as indicated below.

To create them, by clicking on the "Add rule" button, we set the first rule:


This completes the Internet Center setup. To check the operation of the Internet center with a DVR connected to it, you can try to connect to it in any way convenient for you.
If the connection fails, check the correctness of the rules (the DVR must be turned on and connected to the Internet center), to do this, by clicking on the link http://www.networkcenter.info/tests/portcheck, enter in turn the values of the ccc and ddd ports specified in the individual parameters.

By pressing the button at the bottom, the system will indicate the status of the port. Both ports must be open. Checking the opening of ports should be done from a device that has Internet access, but is not connected to your Keenetic.
If, despite all your efforts, you were unable to connect, contact our technical support service in a convenient way for you and let us know at what stage you were unable to create a connection.
TIP: After you have set up the Keenetic, it's a good idea to save the configuration to a file on your computer so that it can be restored as soon as possible in an emergency.

Then you need to click on the file startup-config a window will appear

To access the router interface remotely (via http or telnet), follow the steps below.
1. To configure remote access to the web interface of the router (via http; port 80 is used by default) in the menu Security > Network Address Translation (NAT) create the following rule:
Interface: ISP
Protocol: TCP/80
Port number: 80
Redirect to address: 192.168.1.1
(IP address of router)
New destination port number: 80
If you want to allow remote access to the router's web interface only from a specific IP address or only for a specific subnet, in this case the NAT rule above does not need to be created, but it will be enough to create only one Firewall rule in the menu Security > Firewall:
In our example, a rule is created for the interface ISP(Interface for accessing the Internet. If you use a connection with PPTP authorization (Real IP service), you need to create a rule for this interface.)
In field Action set value Allow, in field Source IP address set value One(for access from only one IP address) or Subnet(for access from a specific subnet of IP addresses) and specify the IP address or subnet accordingly. In field Protocol you can specify a specific standard protocol (in our example, this is the TCP / 80 port) through which access will be allowed. In field Destination port number you can also specify the desired port number yourself if it is non-standard.
2. For remote access via telnet protocol (to the Keenetic command line interface), the NAT rule will look like this:
Interface:ISP(Interface for accessing the Internet. If you use a connection with PPTP authorization (Real IP service), you need to specify it.)
Protocol: TCP/23
Port number: 23
Redirect to address: 192.168.1.1
(IP address of router)
New destination port number: 23
A similar setup would look like this:
3. If you need to transfer remote control of the device from the Internet to another port (for example, you want to use port 8080 to access the web configurator), in the NAT rule, in the Port number you need to specify the required external port number (for example, 8080):
Interface: ISP(Interface for accessing the Internet. If you use a connection with PPTP authorization (Real IP service), you need to specify it.)
Protocol: TCP/80
Port number: 8080
Redirect to address: 192.168.1.1
(IP address of router)
New destination port number: 80
A similar setup would look like this:
4. To allow the router to respond to Ping, also in Russian it is sometimes called ping, this is the time your computer responds to a request. In other words, this is the amount of time it takes for a packet sent from a sending computer to travel to a destination computer on the network and return back. The more ping, the longer the waiting time required to open a web page, download online game data.
The ping utility is one of the main diagnostic tools in TCP / IP networks and is included in the delivery of all modern network operating systems. ">ping from an external network (from the Internet), you need to add an allow rule in the Firewall settings in the menu Security > Firewall:
Action: Allow
Source IP address: Any
Destination IP address: Any(if you use a global permanent "white" IP address ("Real IP" service), you can specify it)
Protocol: ICMP
Now you can connect to the web configurator of your Keenetic router from the Internet.
It is known that Keenetic series Internet centers are distinguished by their reliability and stability. But sometimes you need to remotely make some changes to the work local network, for example, forward ports, or make sure that the Keenetic is in the global network and responds to (ICMP Echo-Request) requests via the ICMP protocol, in common ping requests. To organize remote access to the Keenetic, you need to open external access to the WEB interface via the HTTP protocol, and to receive (ICMP Echo-Reply) responses, or ping responses, you must allow answering ping requests. How to do this is described below. The instruction is relevant for the entire series of Keenetic(s) with second generation firmware NDMS V2.
For demonstration, we have organized a local network with the address space 192.168.1.1 - 192.168.1.254 based on Zyxel Keenetic LIte 2 - №1 . Another Internet center Zyxel Keenetic Lite 2 (ZYXEL KEENETIC LITE II) was connected to this network №2 with internal address space 192.168.0.1 - 192.168.0.254. To Keenetic(y) №2 we will open external access and allow the passage of ping requests.
Zyxel Keenetic ping
 First, let's go to Keenetic №2
and in the Internet / Connections / Brodband connection tab, assign it a static IP 192.168.1.5. Subnet mask 255.255.255.0 and default gateway 192.168.1.1
First, let's go to Keenetic №2
and in the Internet / Connections / Brodband connection tab, assign it a static IP 192.168.1.5. Subnet mask 255.255.255.0 and default gateway 192.168.1.1
 Next, go to the Security / Firewall tab and create a rule for the "Broadband connection (ISP)" interface, since we are connected to Keentic (y) №1
through this interface. To create a rule, you must click the "add rule" button. In the pop-up window, allow packets to pass through the ICMP protocol
Next, go to the Security / Firewall tab and create a rule for the "Broadband connection (ISP)" interface, since we are connected to Keentic (y) №1
through this interface. To create a rule, you must click the "add rule" button. In the pop-up window, allow packets to pass through the ICMP protocol
Now let's go to the Keenetic(a) local network №1
and ping the address 192.168.1.5
. To do this, run the program cmd.exe. In WIN7 press WinKey+r, in the pop-up window enter cmd.exe and press enter. In the black window that appears, enter the command ping 192.168.1.5. The "ping" utility reports that the host at the given address is reachable and shows the packet transit time.
Zyxel Keenetic remote access
 We open remote access. We go to the WEB interface of Keenetic (a) №2
. Go to the Security / Firewall tab. Select the Network Address Translation (NAT) tab. Click the "Add Rule" button. In the pop-up window choose:
We open remote access. We go to the WEB interface of Keenetic (a) №2
. Go to the Security / Firewall tab. Select the Network Address Translation (NAT) tab. Click the "Add Rule" button. In the pop-up window choose:
- Interface: Broadband connection (ISP)
- Protocol: TCP
- TCP/UDP Ports: One port 8080
- Redirect to address: 192.168.0.1
- New destination port number: 80
Having a Keenetic series Internet center, even without being an IT specialist, with our help you can implement almost any system on your device according to your requests. All you need to set up is the ability to access your device through the "cloud client". If you experience difficulties with setting up your router, we can help you with this through the application My.Keenetic from Google Play or from the App Store. All you need is to send us a QR code to reverse side router (if the router is at factory settings, i.e. with default settings). This can be useful if you do not have a dedicated IP and you use our vpn service on a server without dedicated IPs, for example, you need an American IP to play on xbox, or you forgot to renew the VPN package in time and access to the dedicated IP was lost. In this case, the possibility of remote control through the "cloud client" is useful to change the settings of the router without a dedicated IP.
Question:
How can I use the "Cloud Clients" function in Keenetic series routers?
How can I use the "Cloud Clients" function in Keenetic series routers?
Starting with firmware version 2.05, the Keenetic series routers have added a component that allows you to access the router settings from mobile devices from anywhere on the Internet (even in cases where you are not in the local network of the router and it does not have a public " white" IP address).
To set up and connect to the Keenetic, follow these steps:
1. Install or make sure installed required component firmware Router management module via cloud service.
4. After launching, the application will ask you to connect to the Wi-Fi network of your router (if you have already configured the device and configured the Wi-Fi network), or scan the QR code on the back of the router (in if the router is at factory settings, i.e. with default settings).
5. In our example, the Keenetic has already been pre-configured, so we select an existing one wifi network. The app will ask you to enter an administrator account. After entering your account, click Ready.
6. After connecting, you will see the basic information about the Keenetic.